
Step 1: Planning and Measuring
The project begins by measuring the area beside the house and marking the desired shape and dimensions of the walkway. The curved entrance section is carefully planned to create an attractive appearance and provide easy access to the doorway.
Step 2: Site Clearing
All grass, weeds, roots, rocks, and debris are removed from the construction area. The ground is cleaned thoroughly to prepare for excavation and ensure a stable foundation.
Step 3: Excavation
The soil is dug out to the required depth, typically 4–8 inches depending on local conditions and the intended use of the walkway. The excavated area creates space for the base material and concrete slab.
Step 4: Base Preparation
A layer of crushed stone or gravel is spread evenly across the excavated area. This base helps prevent settling and improves drainage. The gravel is compacted using a plate compactor or hand tamper until it becomes firm and stable.
Step 5: Installing Formwork
Wooden forms are placed around the perimeter of the walkway. Stakes are driven into the ground to hold the forms securely in position. The forms are checked for proper alignment, level, and curve accuracy.
Step 6: Reinforcement Installation
Depending on the project requirements, steel reinforcement mesh or rebar is installed inside the forms. This reinforcement increases the strength of the concrete and helps reduce cracking over time.
Step 7: Mixing the Concrete
Concrete is prepared using cement, sand, gravel, and water. The mixture must have the correct consistency to ensure both strength and workability.
Step 8: Pouring the Concrete
The fresh concrete is poured into the prepared forms. Workers distribute the concrete evenly throughout the entire area using shovels and rakes.
Step 9: Screeding the Surface
A long straight board, called a screed, is moved across the top of the forms to remove excess concrete and create a level surface.
Step 10: Floating the Concrete
After screeding, a bull float or hand float is used to smooth the surface and push larger aggregate particles below the surface. This creates a more uniform finish.
Step 11: Edge Finishing
Special edging tools are used along the perimeter of the walkway. This creates clean edges and helps prevent chipping after the concrete hardens.
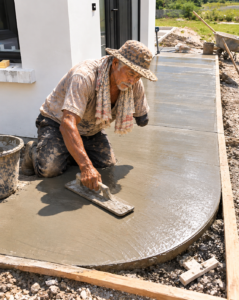
Step 12: Hand Troweling (Shown in the Image)
The craftsman kneels on the slab and uses a hand trowel to smooth the concrete surface. He carefully works the concrete, removing imperfections, filling low spots, and creating a professional finish. This stage requires patience, skill, and years of experience.
Step 13: Creating Expansion Joints
Control joints are cut or tooled into the concrete to help control where natural cracking may occur as the concrete expands and contracts.
Step 14: Final Surface Inspection
The worker inspects the entire walkway, checking for smoothness, consistency, and proper drainage. Any remaining imperfections are corrected before the concrete fully sets.
Step 15: Curing the Concrete
The concrete is allowed to cure slowly. Water, curing compounds, or protective coverings may be used to maintain moisture and maximize strength development.
Step 16: Removing the Forms
After the concrete has gained sufficient strength, the wooden forms are carefully removed, revealing the finished edges of the walkway.
Step 17: Site Cleanup
Excess materials, tools, and construction debris are removed. The surrounding area is cleaned and restored.
Step 18: Finished Walkway
The project is complete. The result is a smooth, durable, and attractive concrete walkway that improves both the appearance and functionality of the home.
Final Result: A professionally finished concrete pathway built through careful planning, skilled workmanship, attention to detail, and dedication from start to finish. 🚧🏠💪



