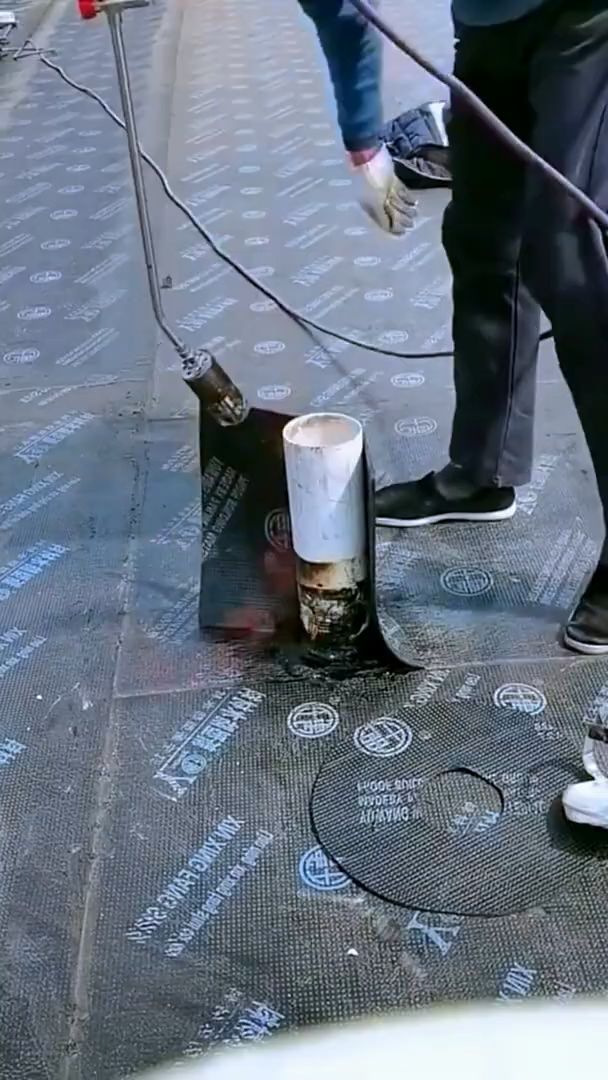
Water pipe waterproofing is an important process for protecting pipes, joints, and surrounding structures from moisture penetration and corrosion. Proper waterproofing is commonly used for plumbing systems installed through walls, floors, bathrooms, basements, roofs, and other areas exposed to water. A well-prepared waterproofing system helps prevent leaks, structural damage, mold growth, and premature pipe deterioration.
Step 1: Inspect the Pipe
Begin by inspecting the entire pipe section that requires waterproofing. Check for cracks, corrosion, loose fittings, damaged insulation, or existing leaks. Pay special attention to joints and locations where the pipe passes through a wall or floor. Any active leak should be repaired before waterproofing begins.
Step 2: Clean the Surface
Remove dust, dirt, grease, rust, old sealant, and loose coating from the pipe and surrounding surface. Use a wire brush, scraper, or suitable cleaning tool depending on the pipe material. The surface must be clean and dry because waterproofing materials generally bond poorly to contaminated or wet surfaces.
Step 3: Prepare the Pipe Joint
Inspect threaded, welded, soldered, or mechanical connections carefully. Tighten loose fittings and repair damaged joints before applying waterproofing. If the pipe passes through a wall or floor, ensure there is sufficient space around it for the waterproofing material to form a continuous seal.
Step 4: Apply Primer
Apply a compatible waterproofing primer to the prepared surface when required by the selected waterproofing system. Spread the primer evenly around the pipe penetration and adjacent substrate. Allow it to dry according to the manufacturer’s instructions before applying the main waterproofing layer.
Step 5: Seal Gaps Around the Pipe
Fill larger gaps between the pipe and surrounding wall or floor material with an appropriate flexible sealant or repair compound. Apply the material evenly around the entire circumference of the pipe. A flexible seal is important because pipes can expand, contract, or vibrate slightly during normal operation.
Step 6: Install Waterproofing Reinforcement
For areas exposed to significant water or movement, install a waterproofing membrane, reinforcing fabric, or pipe collar around the penetration. Position the reinforcement so it overlaps both the pipe and surrounding waterproofed surface. Press it firmly into the wet waterproofing material to eliminate air pockets.
Step 7: Apply the First Waterproofing Layer
Apply the selected waterproof coating around the pipe using a brush, roller, or appropriate application tool. Cover the pipe penetration and surrounding substrate evenly. Maintain the recommended thickness and extend the coating beyond the immediate joint to create a continuous protective barrier.
Step 8: Apply Additional Coats
Allow the first waterproofing layer to dry for the recommended period before applying another coat. Apply the second layer in the appropriate direction to improve coverage and reduce weak points. Inspect the surface between coats and repair pinholes, cracks, or areas with insufficient material.
Step 9: Allow Proper Curing
Protect the waterproofed area while the coating cures. Keep it away from flowing water, physical impact, dust, and excessive movement during the curing period. Do not cover the area with tiles, insulation, soil, or other materials until the waterproofing system has reached the required curing condition.
Step 10: Test and Perform Final Inspection
After the waterproofing system has fully cured, inspect the entire area for gaps, cracks, bubbles, peeling, or incomplete coverage. Where appropriate, perform a controlled water or leak test according to the system requirements. Check pipe connections and surrounding surfaces carefully for signs of moisture. Once the test is successful, complete the surrounding construction or protective finish. Regularly inspect waterproofed pipe penetrations, especially in bathrooms, roofs, basements, and other wet areas. Repair damaged sealant or membrane promptly. Proper surface preparation, compatible materials, sufficient coating thickness, flexible joint sealing, and adequate curing time help create a durable waterproof barrier that protects both the water pipe system and the surrounding building structure from moisture-related damage.



